Thursday, October 13, 2011

Monogrammed Twine Wrapped Letter

I'd like to start of today by thanking Pinterest for existing. Seriously. WHERE has this website been all of our lives?

I stumbled upon this, and had to make it: 

                                                   http://pinterest.com/pin/176218524/

I couldn't quite figure out how to make the little swirly flowers they used. So I improvised. And noticed that their door is much cleaner than mine. Let's ignore that.


Materials needed: 
Large Monogrammed letter
Ribbon
Spool of Twine
Large Button
Hot glue gun

Wrap twine around letter using hot glue. You can wrap 5 or 6 pieces and then glue to be more efficient. I learned this the hard way by individually gluing each wrapped piece. And then my engineer of a husband questioned my method. And he was right. Don't do it. It will drive you crazy. Stick to every 5-6 pieces. Trust me.

Once letter is wrapped, assemble flower. Here is how I created mine: 

Cut ribbon into 3/4" strips. Use a lighter to burn off thread so it doesn't unravel. There is also some glue you can buy for this.

One at a time, assemble flower by adding a dot of hot glue to bottom of ribbon piece. Let ribbon pieces overlap until a flower shape has been created. 

Hot glue a large button to center of flower, and then hot glue flower to twine letter. 

You can also sew on buttons and beads to get this: 


Hang letter with hot-glued ribbon. 
Overall, I was pretty impressed with how easy it was. But I will not give up on those little swirly flowers. I must make them. 

Wednesday, October 12, 2011

Pizza Pockets

I have a question. Who decided to name a calzone a calzone?

If I were in charge of naming food, I would declare calzones to be pizza pockets. Because it just sounds neater. And everyone loves pockets. And pizza. Pizza + Pockets= BFF for life.

Ok I'm moving on.

I discovered this recipe in Cooking light years ago, and have been making these ever since. I do not drain my meat, and pretty much threw all the rules out the window, so I can't vouch for whether these will or will not make keep you skinny. But I like to believe they still do.

Pioneer Woman-style, I will give you a play-by-play, because they are kind of tricky, but once you get the swing of them you will be goodforlife.

Sausage and Pepper Pizza Pockets [Calzones]

Start with store-bought pizza dough. It is usually big enough for one whole pizza. Split your dough into 4 even sections, and roll out till flat and very oval shaped.


Meanwhile, cook up sausage and peppers (see directions below). Once cooked throughout, add 1/2 cup of meat and pepper mixture to dough on one side, leaving a 3/4'' -1'' border of dough around it. Add 3 tablespoons tomato sauce and 1/3 cup cheese to each pizza pocket.

Close your pocket up. It will be VERY full, but that will just make your life better. Adjust the size of the calzone to your hunger needs. Use your fork to smash the two sides of dough together in one cohesive seam. Spray Calzone on both sides with cooking spray. (This will help it get crispy).

 Bake at 425 for 15-20 minutes until crispy and lightly browned.


Sausage and Pepper Pizza Pockets [Calzones]
16 oz store-bought pizza dough
Flour
19 oz. hot Italian sausage, casings removed
1 bell pepper, diced
1 tsp. basil
1/4 cup red wine
24 oz store-bought spaghetti sauce
Dash Red pepper flakes
Cooking Spray
1 1/3 cup mozzarella cheese, shredded


1. Split your dough into 4 even sections, and roll out on a floured surface until flat and very oval shaped.
2. Cook sausage in a pan with EVOO, until brown and cooked throughout (about 5 minutes). In the last minute of cooking, add bell pepper to the pan, cooking until tender and translucent (another 3 minutes.)
3. Prepare sauce. Add spaghetti sauce, red pepper flakes, red wine, and basil in a bowl and combine.
4. Assemble calzones. Add 1/2 cup of meat and pepper mixture to dough on one side, leaving a 3/4'' -1'' border of dough around it. Add 3 tablespoons tomato sauce and 1/3 cup cheese to each pizza pocket.
5. Close your pocket up. Use your fork to smash the two sides of dough together in one cohesive seam. Spray Calzone on both sides with cooking spray. (This will help it get crispy).
6. Bake at 425 for 15-20 minutes until crust is crispy and browned. Serve with remaining spaghetti sauce.

Makes 4 calzones. Feel free to switch it up and add any other pizza toppings you like!

Printable Recipe


"No wonder my heart is filled with joy...my body rests in hope." Acts 2:26

Tuesday, October 11, 2011

A McWonderful-versarry


3 years ago today we were married.

3 years ago today we walked hand in hand down the aisle as Mr. &  Mrs.

3 years ago today was the best day of my life.

3 years ago today I didn't know what I was in for.  3 years can be a short time to some, and long time to others. It's been an exciting chapter so far, and I've learned a lot.

I've learned that he likes to have "sock parties" around our house, and now it makes me laugh to find piles of socks everywhere, instead of screaming.

I've learned that no matter what I cook for dinner, he always dreams about having a Buffalo Chicken Sandwich. Because it's his favorite. And he needs no other reason.

I've learned that he thinks I'm crazy. In a good way. And he loves it.

I've learned that at 4 am after having my tonsils removed, he's there with a popsicle, trying to make the pain go away.

I've learned that he will be there beside me when I get a new job, and yell and get excited right along with me.

I've learned that he will also be there for me when I lose my job, and shout in anger about what he wishes he could do to fix the situation.

I've learned that love really does get better with time. And that every day, every hour, every minute, every crazy second with him is a blessing. And I can't wait until the 3 years turns into 30, and the 30, and if we could ever be so lucky, would turn into 300.


Sunday, October 9, 2011

If I were a pancake

If I were a pancake, I'd be tan, fluffy and round, with a little crunchy butter-induced edge around my middle.  I may have just described an oompa loompa. Anywho, in my fantasy world pancakes cooperate. In real life, notsomuch.

But I eat them and I love them anyway. Since I have been old enough to cook pancakes, I've watched my parents whip up letters and shapes and flip them with all their fluffy goodness like it was nobigdeal. And then I took a turn at it. And failed. I finally decided that messy and unperfect pancakes taste just as yummy as perfect letter and mickey mouse shaped pancakes do. And my stomach doesn't know the difference.

So I forge on.

Today, I am enjoying my anniversary weekend at my in-law's gorgeous beach house. Hello, sunset:


And since we just got here yesterday, it means I don't have eggs in the house. But I want need pancakes. And there is also no pancake mix. So I mustered up the courage to make some pancakes from scratch. Yup. Apparently failure doesn't bother me. If I can mess up easy-to-make pancakes, who in their right mind thinks I can make them from scratch. Me. I do.

So after scanning online, I came up with a recipe that worked. (If you ignore my lack of flipping-at-the-appropriate-timing-skills). And they were fluffy, round and delicious!!


Cinnamon No-Egg Pancakes

1 cup All Purpose Flour
3 Tablespoons Sugar
2 1/4 teaspoons baking powder
1/4 teaspoon salt
2 1/2 tablespoons butter, melted
3/4 cup + 2 tablespoons water
1 teaspoon cinnamon

3 tablespoons butter for frying pancakes.

1. In a large bowl, stir together flour, sugar, baking powder, cinnamon and salt.
2. In a separate bowl, combine melted butter and water.
3. Mix butter/water mixture with dry ingredients, stirring with a whisk for 1 minute for added fluffyness. It is okay if batter is slightly lumpy.
4. On a frying pan over medium-medium-high heat, cook pancakes in batches, using 1/2 Tablespoon butter  each 2-3 pancakes. Times will vary, each pancake will need to cook on each side 1-2 minutes to desired color.

Makes 12 Sandollar sized pancakes. Serve with fresh fruit and dollops of butter and syrup or honey as you like!

"Delight yourself in the Lord, and he will give you the desires of your heart. " Psalm 37:4


Friday, October 7, 2011

For the Love of Pumpkin!

I'm a lover of all things pumpkin.


Pumpkin Lattes

And anything and everything that looks or sounds or tastes like pumpkin. 

So today, in honor of October, and in honor of pumpkins everywhere, I have made pumpkin muffins. It is my gift to you. Whether you are obsessed with pumpkin or not.


Pumpkin Muffins


1 3/4 cup All-purpose Flour
1 cup Sugar
1 teaspoon Baking Powder
1/2 teaspoon Baking Soda
1/2 teaspoon Salt
1/2 teaspoon Cinnamon
2 Large Eggs
1/4 cups Vegetable Oil
1 teaspoon Vanilla
1 can Pumpkin
1/4 cup semi sweet chocolate chips.


1. Preheat oven to 350 degrees, line 12 muffin tins with cupcake liners.
2. In a large mixing bowl, combine flour, sugar, baking powder, baking soda, salt and cinnamon.
3. Add in pumpkin, oil and eggs, stirring until creamy and thick. Stir in chocolate chips. 
4. Fill cupcake liners 2/3 full and bake at 350 for 23-27 minutes until a toothpick inserted in muffin comes out clean.


Serve warm with a dollop of butter. Don't be jelly. You can make them too. 


There is a time for everything, and a season for every activity under the heavens" Ecclesiastes 3:1

Wednesday, October 5, 2011

Salted Caramel Brownies


So I decided to take a leap and make some homemade brownies. Yup. I'm not a baker one bit. But I aspire to be, and apparently thats all it takes.

And lately I have been swooning over salted caramel. Who found this amazing discovery and WHY did it take so long?

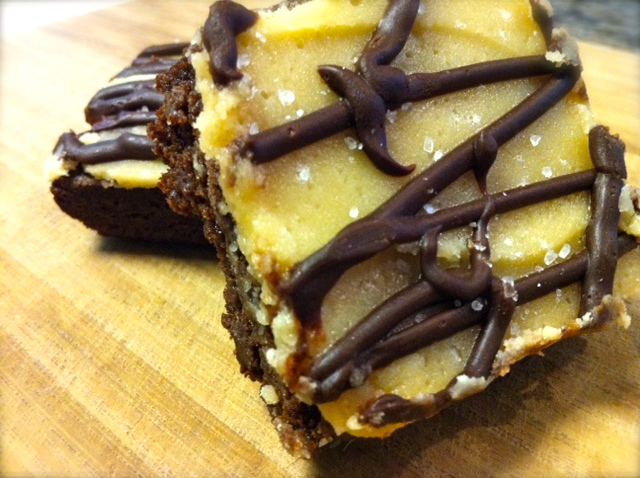
So I couldn't just make any ol' brownies. I had to have Salted Caramel brownies. Pronto.

And the thing about these ah-mazing brownies is that you have to make the soft, pillowy, chocolatey bottoms first. And then the whole house will smell like brownies. Then, while they are supposed to be cooling so you can make and add the salted caramel on top, your husband will ask "Why aren't we eating the brownies yet."

And then you will try to explain that the good part isn't on them yet. But he will see brownies and he will want. So you will give him a square of plain brownie while the rest are trying to cool. And he will say "They are good, but they are missing something."

It's a little like life. We see and smell the sweet brownies in life and we want them. We don't want to wait for Gods perfect timing, or what he's planning on working on us during the timing. We.want.brownies. And God tells us to wait. He may or may not sneak in an "almost ready brownie" to give you a taste of what's to come, but you will think--there's something more I'm waiting for. And you will be right, because God's provision is SO much bigger than what we can imagine.

And then comes the salted caramel topping in life. And you see the neat little package in front of you, and you decide it IS much prettier, and more perfect, than the "almost ready brownie", and just as the Baker Maker intended. And then you eat it, and love it, and be thankful. And full.

"Show me your ways, LORD, teach me your paths. Guide me in your truth and teach me, for you are God my Savior, and my hope is in you all day long." Psalm 25:4-5


Salted Caramel Brownies
adapted from Cooking Light Magazine


Brownies:
3/4 cup all-purpose flour
1 cup granulated sugar
3/4 cup unsweetened cocoa
1/2 cup packed brown sugar
1/2 teaspoon baking powder
6 tablespoons butter, melted
2 large eggs
1 teaspoon vanilla extract
Cooking spray

Topping:
1/4 cup butter
1/4 cup packed brown sugar
3 1/2 tablespoons evaporated fat-free milk, divided
1/4 teaspoon vanilla extract
1/2 cup powdered sugar
1/4 cup semisweet chocolate chips
1/8 teaspoon coarse sea salt

1. Preheat oven to 350 degrees.
2. Prepare brownies: Combine flour and next 4 ingredients (through baking powder) in a large bowl, stirring well with a whisk. In a separate bowl, Combine 6 tablespoons butter, eggs, and 1 teaspoon vanilla. Add butter mixture to flour mixture. Stir to combine. Scrape batter into a greased 9-inch square baking pan , and bake at 350 for 19 minutes or until toothpick in center comes out with moist crumbs. Cool on wire rack or in fridge.
3. Prepare topping: Melt 1/4 cup butter in a saucepan over medium heat. Add 1/4 cup brown sugar and 1 1/2 tablespoons milk; cook 2 minutes. Remove from heat. Add vanilla and powdered sugar; stir with whisk until smooth. Spread mixture evenly over cooled brownies. Let stand until set.
4. Combine 2 tablespoons milk and chocolate in a microwave-safe bowl ; microwave on HIGH for 45 seconds until melted and a silky consistancy. Add to Ziploc bag (carefully), and cut a small hole in one corner. Pipe out chocolate in preferred design. Sprinkle sea salt over chocolate.

Calories:180, Fat:7.2g, Protein:21g, Carb:27.8g; Fiber:0.8g; Sodium:76 mg, Calc: 26mg

Sunday, October 2, 2011

Meat-a-ball Subs

I just came back from a wedding in NY and I'm feeling very Northern right now. I learned how to pronounce cannoli this weekend as "Gah-noli" or "Cah-NO-li" depending on what part of NY you are from. And just how high you swing your hands while yelling it. It seems to be a weird thing to argue about. Bless their NY hearts.

Upon returning back to NC and going to the grocery store, a dream was born. A dream for Meat-a-balls. (Hand gesture).

All thanks to our new losemyjob budget, I'm loving Harris Teeter's Meal Deals. I truly believe this deal requires some sort of secret government clearance to access. And upon losing my job, and thus having more time to stare at store signs in the entry way of HT, I somehow gained clearance to this magical deal. Andyoucantoo.

Here's this weeks Meal Deal: Yep, all this grub for $5! It claims to feed a family of 4, but I'm imagining 2 of your 4 should be munchkin-sized.


So it was the perfect inspiration for some super italian Meat-a-ball subs. And I have a little obsession with italian food, and anything drenched in marinara sauce. I have the opposite feeling for jarred pasta sauce. Sigh. I think that might be called loathing. But I am learning to love accept the cheaper things in life, and I was up for the challenge to make it spectacular.

The secret to the subs was in painting a garlic-butter-masterpiece on the rolls. Its a secret I figured out a long time ago for any hot sandwich, and I will never eat naked rolls again. Ever.

Meatball Subs: 


For the Meat-a-balls:
1 14 oz bag frozen Meatballs
22.5 oz Prego Meat Pasta Sauce
1/3 cup sherry or Red wine
2 TBSP EVOO
2 tsp red pepper flakes
1 tsp basil
2 TBSP butter
1 tsp garlic powder or 1 clove garlic
Freshly cracked black pepper, to taste
6 slices provolone cheese

For the not-so-Naked Bread:
3 sub rolls
1 tsp parsley
4 TBSP butter
1 tsp garlic

1. Saute meatballs in EVOO for 1-2 minutes until browned. De-glaze the pan with sherry or red wine. Add Spaghetti sauce, red pepper flakes, basil, butter, garlic, and black pepper and cook for 6-8 minutes until meatballs are warm in the center. (Meatballs should be pre-cooked before frozen, so you are just heating them up.)

2. Meanwhile, melt butter, parsley, garlic in the microwave for 40 seconds to 1 minute. Using your super sassy polka dot basting brush, dress your naked rolls with the glorious mixture.

3. Assemble Meatball subs. Add 4-5 meatballs per sub and slather in sauce. Lay provolone cheese on top to melt. Serve with extra sauce for drenching.