Showing posts with label DIY. Show all posts

Saturday, January 19, 2013

heart garland diy

Love day is on its way!


I decided that I want to start decorating for every holiday possible. And by possible I mean every holiday that Lucy naps so I can craft for.

So far in 2013 we have successfully accomplished one project. It takes about 30 minutes and can easily be done during a babynap.

I got the idea from here. In case you like the look but don't feel up to DIY-ing. Yellow Bird + Yellow Beard has some super cute garland you can buy.


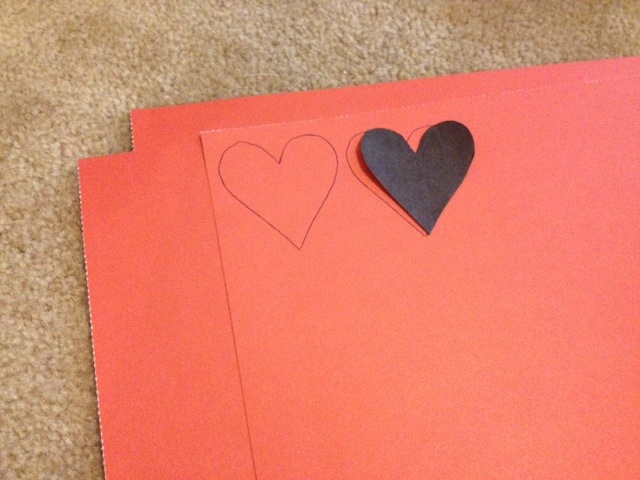
Print out a heart and trace it on cardstock. (Make your life easier and stack the cardstock). If you happen to have a fancy cricut machine I'm sure this is where it would come in handy.

Otherwise, you can use a pen and scissors. And be frugal. Like me. #wishihadacricut


I ended up with about 25 hearts.


Set your sewing machine to the longest stitch, leave some slack at the beginning, and sew across the heart. I just pulled the thread about an inch or so in between hearts to make a gap in between them. No backstitching required.


and...voila! Hang your pretty heart garland.

Wednesday, August 8, 2012

Pins-day:Bibs and Burp Cloths.

Happy Pins-day!

With baby bean on the way, I have had a mega nesting urge, including a big knack to sew.

Luckily, there are lots of itty bitty little baby things on Pinterest that you can easily replicate at home.

And "sew" I did.

Baby Bibs courtesy of Chickpea Sewing Studio


Burp Cloths courtesy of MADE


There are hundreds of bib and burp cloth tutorials on Pinterest, but I found these to be the simplest to follow.

Aren't they precious?

White fabric: chenille
Print: Assorted cotton

I hope this Pins-day leaves you full of DIY inspiration!

“For the LORD takes delight in his people; he crowns the humble with victory.” Psalm 149:4

Thursday, April 12, 2012

sixteen.


How far along? 16.5 Weeks
Maternity clothes? I DIY'ed 2 things this week! [Thank you pinterest]. The maxi skirt shown above and some dress pants (will reveal later.)
Sleep: I <3 sleep. In fact, I almost took a nap in the middle of my workout this week.

Best moment this week: Getting a surprise gift in the mail from a friend for our sweet little bean. We have gotten so many sweet gifts and it never gets old to me!! Everything is so teeny and adorable.

Miss Anything? Being able to pull my pants up all the way. And zip them. Haha!!
Movement: A little flutter which feels something close to a butterfly flapping its wings or a fish swimming around.
Food cravings: Cereal and fruit.

Have you started to show yet: Yes- in most outfits. I have noticed people I pass by at work glance down at my belly too. But they don't ask and it makes me giggle. I feel like I should wear a sign that says "Yes I'm pregnant."
Gender prediction: Although the winds have shifted, I'm still thinking girl.

Pregnancy advice this week: Don't be afraid to DIY your own maternity wear! There are great posts on pinterest that will take you through each and every step. 

"We wait in hope for the LORD; he is our help and our shield." Psalm 33:20


DIY'ed Maxi Skirt


Wednesday, January 25, 2012

Pinecone Wreath

Do you hate un-decorating after the holidays as much as I do?

My house looks so....just like a house.

And less like a Christmasy wonderland.

So I went to work making something wintry that still cheers me up when I pull into my driveway in cold, drab and dreary January.


The awesome part of this project? All those pinecones on there...were free. Yep from the yard.

{And a dear friend gave me her leftover spraypaint. Thankyou.}

Easy-check.
Cleanup your yard-check.
Wintery and cheerful-check.

How To:
1. Collect about 40 medium and small pinecones from your yard.
2. Spray paint all sides of the pinecones with white spray paint. While wet, add white glitter (hard to see in pic).
3. Hot glue onto a styrofoam wreath, covering all sides. This was the tricky part, fitting everything together like a puzzle. Be patient, it will work! Keep flipping them around until you get neat little puzzle piece pinecones.
4. Add ribbon. I sewed a 6'' x 2 yard long strip of fabric to create a giant ribbon, sewing the sides to be hidden and cutting a "V" in the bottom to resemble a ribbon. Tie into a big bow! (You can also just use large ribbon.)

May your January be a little more frosty and festive!

Finally, brothers and sisters, whatever is true, whatever is noble, whatever is right, whatever is pure, whatever is lovely, whatever is admirable—if anything is excellent or praiseworthy—think about such things.” Philippians 4:8 NIV

Sunday, December 11, 2011

NOEL

NOEL
noun \nō-ˈel\
  Christmas; also, a shout of joy at Christmas for the birth
      of the Savior. [Obs.]
     

NOEL. A word you hear over and over this time of year. 


But what does it mean? 

Christmas. 

A shout of joy at Christmas for the birth of the Savior. 


What a sweet sound that must be to His ears. 

This season evokes a lot of joy in peoples lives. Christmas trees, decorating houses, buying and giving gifts to the  people you love. Christmas parties, Christmas carols....


But for some, it can be stressful and maybe even a bit discouraging. 

But the good news is, He promises he has great things in store for you. They're written all over His book. 

"For I know the plans I have for you, declares the LORD, plans to prosper you and not to harm you, to give you a       hope, and a future." Jeremiah 29:11


May you find a reason to shout for joy this Christmas time. May the FIRST Noel bring you joy, peace and hope for   the new year to come, and the promises He has in store for you.

NOEL How-to: 

*N,O,E,L large monogrammed wooden letters
*Christmasy paper (found at Michaels)
*Red Velvet Ribbon
*Modge Podge
*Hot glue & gun

Modge-podge paper to letters (follow directions on Modge Podge or find a how-to video online). When completely dry, assemble ribbon in a V on back of letters. Hot glue to letter and point of V. With ribbon, assemble a bow, and hot glue to V shape. Hang from hooks around your home.

*                                                                                            *                                                                                *

"In those days Caesar Augustus issued a decree that a census should be taken of the entire Roman world. (This was the first census that took place while Quirinius was governor of Syria.) And everyone went to their own town to register.

So Joseph also went up from the town of Nazareth in Galilee to Judea, to Bethlehem the town of David, because he belonged to the house and line of David. He went there to register with Mary, who was pledged to be married to him and was expecting a child." Luke 2:1-5

Tuesday, December 6, 2011

HO HO HO

I've been bitten by the crafty bug this Christmas.


And for just a few dollars this is uuber cute and easy to put together.


All you need are 3-4x6 frames (from the Dollar Store), some Red Velvet Ribbon, and cute christmas-y cardstock.

Just make sure you pay attention when you glue on the ribbon.

Don't have a blonde moment like I did and end up with frames that say "OH" and not "HO".

Yes, yes I did.


Step 1) Print out "H" & "O" letters to your desired style and shape from your printer. Cut out of printer paper, trace onto cardstock, and cut out. Cut out a separate cardstock to the size of the frame. Glue "H" and "O" onto background.


Step 2) Hot glue ribbon to back of frame, and hang!
         
                   *                       *                       *                      *                        *                

Oh-and you may or may not have noticed.

You may or may not see below some verses from the real Christmas story.

And you may or may not have heard it before.

As much as I love Santa and his HO HO HO's, I also love to take a few minutes every day to dwell on the real reason for this season.

Past the reds and greens and sparkly things that make your home beautiful. To dwell on a sweet little baby that was born in a manger, who was put on this earth to grow up and save us all.

"Mary was greatly troubled at his words and wondered what kind of greeting this might be. But the angel said to her, “Do not be afraid, Mary; you have found favor with God.  You will conceive and give birth to a son, and you are to call him Jesus. He will be great and will be called the Son of the Most High. The Lord God will give him the throne of his father David, and he will reign over Jacob’s descendants forever; his kingdom will never end.” Luke 29-33

Monday, November 28, 2011

Three Little Turkeys

So I got crafty right before Turkey day, and after seeing this Onesie Tie How-to on pinterest, I concocted a plan....

Onesie Tie How To

Turkey+onesie tie=LURVE.

These are 3 of the sweetest little turkeys you will ever meet!!


Don't you just want to squeeze them till they gobble? 

Using Wonder-Under and different patterern-ed, fabrics I cut out the turkey's little eyes, beak, and gobbler (idk if that's what its called).

I had some problems with my fabric fraying so had to ad-lib...but they still turned out precious!

Next time I will cut enough fabric to fold the fabric under and THEN sew for less ad-libing, and extra cuteness.

Hope you had a fabulous turkey day!!

"Give thanks to the Lord and proclaim his greatness. Let the whole world know what he has done." 1 Chronicles 16:8


Saturday, October 15, 2011

Falling for Fall!


Its officially fall! Don't be fooled. It may have sounded like fall and seemed like fall but its not really fall until the leaves--fall

I have been on a fall decorating mission. 

And I stumbled across Onelovelylife and fell in bloglove. 

Food. Crafts. And an adorable baby. Sold!

And I attempted her Felt Flower Wreath. And I have to give kudos to Emily for her dedication. To those teeny little petals. Each and every one of them.

I lost my gusto and only made 2 felt flowers. But it ended up beautiful anyway!

Thanks Emily! 


This week I also had some falling-for-fall-fun with our Chalkboard wall:


Happy Fall Y'all!

Thursday, October 13, 2011

Monogrammed Twine Wrapped Letter

I'd like to start of today by thanking Pinterest for existing. Seriously. WHERE has this website been all of our lives?

I stumbled upon this, and had to make it: 

                                                   http://pinterest.com/pin/176218524/

I couldn't quite figure out how to make the little swirly flowers they used. So I improvised. And noticed that their door is much cleaner than mine. Let's ignore that.


Materials needed: 
Large Monogrammed letter
Ribbon
Spool of Twine
Large Button
Hot glue gun

Wrap twine around letter using hot glue. You can wrap 5 or 6 pieces and then glue to be more efficient. I learned this the hard way by individually gluing each wrapped piece. And then my engineer of a husband questioned my method. And he was right. Don't do it. It will drive you crazy. Stick to every 5-6 pieces. Trust me.

Once letter is wrapped, assemble flower. Here is how I created mine: 

Cut ribbon into 3/4" strips. Use a lighter to burn off thread so it doesn't unravel. There is also some glue you can buy for this.

One at a time, assemble flower by adding a dot of hot glue to bottom of ribbon piece. Let ribbon pieces overlap until a flower shape has been created. 

Hot glue a large button to center of flower, and then hot glue flower to twine letter. 

You can also sew on buttons and beads to get this: 


Hang letter with hot-glued ribbon. 
Overall, I was pretty impressed with how easy it was. But I will not give up on those little swirly flowers. I must make them. 

Thursday, September 1, 2011

Busy Morning Buritto

I have a confession. I love breakfast! But I never have time to sit and leisurly eat breakfast while enjoying a steaming cup of coffee. Nope. I reserve that time for sleeping. Because it makes me feel good. And less tired.
So, when I am cooking breakfast, it has to be quick, and something portable I can eat in the car on the go. (While safely holding the wheel at 10 and 2, yes, of course.)

And lately I have been craving McDonald's Sausage Breakfast burrito. I decided to whip up my own version this morning, but a far less greasy-make-you-feel-sluggish version. And it's full of spinach! So you get points for being healthy and it counts as a 3 mile run. (Right?)


Busy Morning Burrito

1/4 cup spinach (I used frozen, either is fine)
1 egg
2 tablespoons pre-made salsa
2 tablespoons shredded cheese
1 small tortilla shell
Dash Red Pepper flakes
Salt & Pepper, to taste
1/2 tbsp butter

Sautee spinach in butter over med-high heat until spinach is tender, add red pepper flakes while cooking. Crack egg into pan and scramble egg and spinach around, until egg is no longer runny (unless you like that sort of thing). Add salt and pepper, to taste.

Assemble burrito: On Tortilla shell, place egg and spinach mixture in middle. Layer salsa and cheese on top. Fold into a neat little burrito.

Wrap in aluminum foil or paper towel to eat as you run out the door.

Printable Recipe

Oh--remember my post about the Chalkboard wall preview? Well we finished it! And it has been a super fun thing in our house to leave notes on, write menus (yes I know thats cheesy), and such.


And even to draw pictures of pigs on, whereby your husband will later come along and rename said pig after your very fat and snorty dog, Roxy:

*no, we did not hang the outlet crooked. This is user error of the camera*

Friday, August 19, 2011

My fabulous DIY project

So I have pondered, complained, scoured craigslist, and stared blankly at the spot above our guest bed that is missing a significant element. A headboard. I wanted something cheap (it IS the guest bedroom), but fabulous.

So I first thought about buying a headboard off craigslist and painting it. That was going to cost about $100. I continued to stare. And ponder. And stare. And then it struck me, I can do this-on the cheap!

I happen to follow this amazing DIY blog called YoungHouseLove that will motivate even the laziest of project do-ers (like myself) to grab a paint brush and a hammer and get to work. I decided I wanted drama, in the form of color for my headboard, and this post gave me the exact inspiration of the color I wanted to add to my life the room.

Click here for the color inspiration

I went with a greener color called "Caribbean Green" and lurved it. (lurve=love for all you non YHL'ers).

Before:

hello fat dog.

After:
hello fabulous!!

For $30 it was a complete DIY success! We went to Home Depot, cut the trim according to our likings (for ~$15), and the baby quart of Caribbean Green paint was another $15. We simply taped of the measured section to paint and then cut the trim accordingly. Home Depot even has these amazing sawing stations too, to make life easier, seen here:
*Of course, it helps to have a super-hunky husband to help with all the cutting and hammering man-jobs.*

So unfortunately while I was waiting for the paint to dry I got the itch. And then this started to happen in our kitchen. Which then morphed into painting the trim and painting the rest of the walls....oh my!


Chalkboard wall!

More on this later...when the kitchen turns right-side-up again!